Upwork_i386.deb is downloaded, but its dependency on libgcrypt11 cause installation failed on Ubuntu 16.04.
Workaround: http://www.webupd8.org/2015/04/fix-missing-libgcrypt11-causing-spotify.html
Upwork_i386.deb is downloaded, but its dependency on libgcrypt11 cause installation failed on Ubuntu 16.04.
Workaround: http://www.webupd8.org/2015/04/fix-missing-libgcrypt11-causing-spotify.html
Origin by Dan Bricklin
My take is Omeka 2.3 and 1.4.2 on Ubuntu 14.04. Basically the best documentation I can get is http://omeka.org/codex/Install_on_Ubuntu_using_Terminal and a reference at http://omeka.org/codex/Install_on_Ubuntu. Here are some tweaks:
First follow up the steps on package installation. Ubuntu 14.04 uses Apache 2.4.7, www-data as group name, and its document root is /var/www/html. I find it is easier utilizing this settings to make it working.
$ cd /var/www
$ sudo wget http://omeka.org/files/omeka-2.3.1.zip
$ sudo unzip omeka-2.3.1.zip
$ sudo mv omeka-2.3 omeka
# $ sudo mv omeka-2.3/* /var/www/html
# $ sudo mv omeka-2.3/.htaccess /var/www/html
$ sudo usermod -a -G www-data your_ubuntu_username
$ cd /var/www
$ sudo chown -R root.www-data html
$ sudo chmod 775 html
On permissions, only files directory needs 755 and 644.
Then, config MySQL server:
$ mysql --user=root -p mysql
mysql> CREATE USER ‘your_name’@’localhost’ IDENTIFIED BY ‘mysecret’;
mysql> GRANT ALL PRIVILEGES ON *.* TO ‘your_name’@’localhost’ WITH GRANT OPTION;
# use some_db.* for specific database
mysql> SHOW GRANTS FOR ‘your_name’@’localhost’;
mysql> CREATE DATABASE omeka;
Edit db.ini to fit your configuration.
Edit Apache2 configuration file:
$ sudo vi /etc/apache2/apache2.conf
# line 166:
< AllowOverride None
---
> AllowOverride All

$ cd /etc/apache2/sites-available
$ sudo cp -a 000-default.conf your.site.com
$ sudo vi your.site.com
12c12
<       DocumentRoot /var/www/html
---
>       DocumentRoot /var/www/omeka
20,21c20,21
<       ErrorLog ${APACHE_LOG_DIR}/error.log
<       CustomLog ${APACHE_LOG_DIR}/access.log combined
---
>       ErrorLog ${APACHE_LOG_DIR}/omeka-error.log
>       CustomLog ${APACHE_LOG_DIR}/omeka-access.log combined

$ cd /etc/apache2/sites-enable
$ sudo ln -s ../sites-available/u2.rchss.sinica.edu.tw .
$ sudo rm -f 000-default.conf
Finally, you might want to update .htaccess file to enable index.php by default.
# Line 28 of /var/www/omeka/.htaccess
DirectoryIndex index.php
Visit http://localhost/install or http://localhost/install/install.php to configure.

For Omeka 1.x you might run into issues like 1) Access Forbidden on Theme Directory 2) Missing MySQLi Extension (not working for Omeka 2.x)
1) edit /etc/apache2/sites-available/000-default.conf to add this:
  <Location>
    DirectoryIndex index.php
    Order deny,allow
    Allow from all
  </Location>
</VirtualHost>
2) edit /etc/php5/apache2/php.ini
extension=mysqli.so
Common follow-up tasks: edit locale at application/config/config.ini
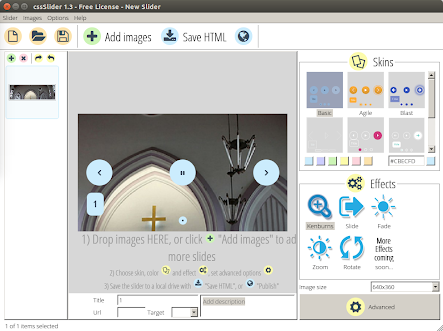
cssSlider 是一套建立 slider 特效的商用軟體,特別之處在於,它不需要 jQuery 就能做到跨瀏覽器的支援,目前可在 Windows 和 Mac 桌面環境安裝使用,Linux 環境可以透過 Wine 執行,即使不懂程式碼,使用者大抵就會自行修改設定。
$ wine .wine/drive_c/cssSlider/cssSlider.exe

事先要準備好數張圖檔,尺寸最好一致。

載入的圖檔,預設會套用 Skin 和 Effect。
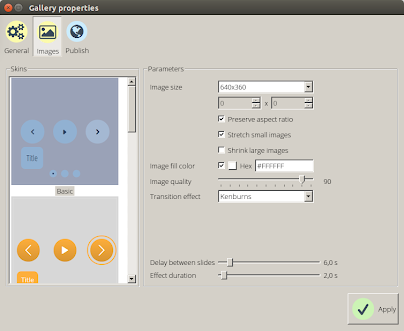
更詳細的設定,包括是否自動撥放、底色選擇、特效微調等。


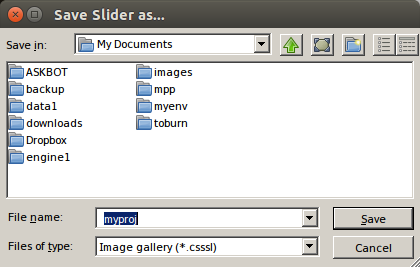
存成專案後,日後可讀取修改,假設專案命名為 myproj 的話,可發現目錄裡會建立 myproj.csssl 檔案,內容是 XML 格式。
cssSlider
+ data1
  + images
    + 1.jpg
    + 2.jpg
    + 3.jpg
    + 4.jpg
    + 5.jpg
    + 6.jpg
  + tooltips
    + 1.jpg
    + 2.jpg
    + 3.jpg
    + 4.jpg
    + 5.jpg
    + 6.jpg
+ engine1
  + basiccontrols.eot
  + basiccontrols.svg
  + basiccontrols.ttf
  + basiccontrols.woff
  + ie.css
  + ie.js
  + style.css
Grive is the command-line tool, while Grive Tools give you the UI for setup. See http://www.thefanclub.co.za/how-to/ubuntu-google-drive-client-grive-and-grive-tools and http://www.lbreda.com/grive/installation http://www.webupd8.org/2012/05/grive-open-source-google-drive-client.html for reference. add-apt-repository is provided by the software-properties-common package.
sudo add-apt-repository ppa:nilarimogard/webupd8
sudo apt-get update
sudo apt-get install grive

sudo add-apt-repository ppa:thefanclub/grive-tools
sudo apt-get update
sudo apt-get install grive-tools
For command line environment, first create the folder for sync, run "grive -a" in that folder and follow the link to get authenticate code. Paste the code and the data will sync. Use cron job for "automatic sync".
剛裝完 Ubuntu 14.04 來試 ElasticSearch,下載 elasticsearch-1.2.1.deb 後,安裝過程會建立 elasticsearch 系統帳號,啟動指令是 sudo service elasticsearch start,想要在 bootup 啟動,要執行 sudo update-rc.d elasticsearch defaults 95 10。
接著試裝 logstash_1.4.1-1-bd507eb_all.deb 遇到下列問題,雖然這東西未必需要安裝:
dpkg: dependency problems prevent configuration of logstash:
logstash depends on java7-runtime-headless | java6-runtime-headless | j2re1.7; however:
Package java7-runtime-headless is not installed.
Package java6-runtime-headless is not installed.
Package j2re1.7 is not installed.
意思是要從 java6 或 java7 選一個來裝,參考文件 [1] [2] 提到 openjdk-7-jre-headless,照提示要用 apt-get -f install 才搞定。想要測試是否正確啟動:
$ curl http://localhost:9200
{
  "status" : 200,
  "name" : "Runner",
  "version" : {
    "number" : "1.2.1",
    "build_hash" : "6c95b759f9e7ef0f8e17f77d850da43ce8a4b364",
    "build_timestamp" : "2014-06-03T15:02:52Z",
    "build_snapshot" : false,
    "lucene_version" : "4.8"
  },
  "tagline" : "You Know, for Search"
}